
Writing smartcards with FlexKey
FlexKey is the Windows tool you use to write your users' personal certificates to smartcards. It also creates the smartcard configuration: the key TheFlex needs to read the cards. FlexKey comes with your TheFlex license.
Where this step fits into the overall setup is shown in Login with smartcard.
What you need
| FlexKey | For Windows. Java is included; start it by double-clicking flexkey.exe. |
| Card reader | A reader for contactless cards on the PC, e.g. HID Omnikey 5022 CL. |
| Smartcards | MIFARE DESFire type, e.g. MIFARE DESFire EV1 8K. New, blank cards work without any preparation. Which cards are suitable and how much memory is needed is described in Which cards are suitable? |
| Certificates | The personal certificates as .p12 files, all with the same password. How to create them is described in Certificates. |
System requirements
| Windows | Windows 10 or 11 |
| Java | Included in the FlexKey package (folder embedded_java), nothing to install. If you start flexkey.jar directly, you need Java 11 or newer with the module java.smartcardio. It is part of every common JDK and JRE, e.g. SapMachine, Eclipse Temurin or Oracle Java. Checked with Java 11 and 21 |
| Card reader | A PC/SC reader (CCID) for contactless cards according to ISO/IEC 14443 type A that passes DESFire commands through to the card. Windows includes the driver for CCID readers. Recommended: HID Omnikey 5022 CL |
| Windows service | The Smart Card service (SCardSvr) must be running. Windows usually starts it as soon as a reader is connected |
| Write access | In the FlexKey folder. FlexKey creates FlexKeyConfig.json, settings.xml and the logs folder there. Therefore do not place FlexKey under C:\Program Files |
If several readers are connected, FlexKey uses the one with a card on it. Notebooks often report additional readers, such as a built-in contact reader or a virtual reader from Windows. The status bar at the bottom shows which reader FlexKey sees.
Existing badge cards
Cards that are already in use, such as employee badges of an access control system, are often locked against changes by the manufacturer. FlexKey cannot write to them then. Test such cards with a single sample first.
1. Set up FlexKey once
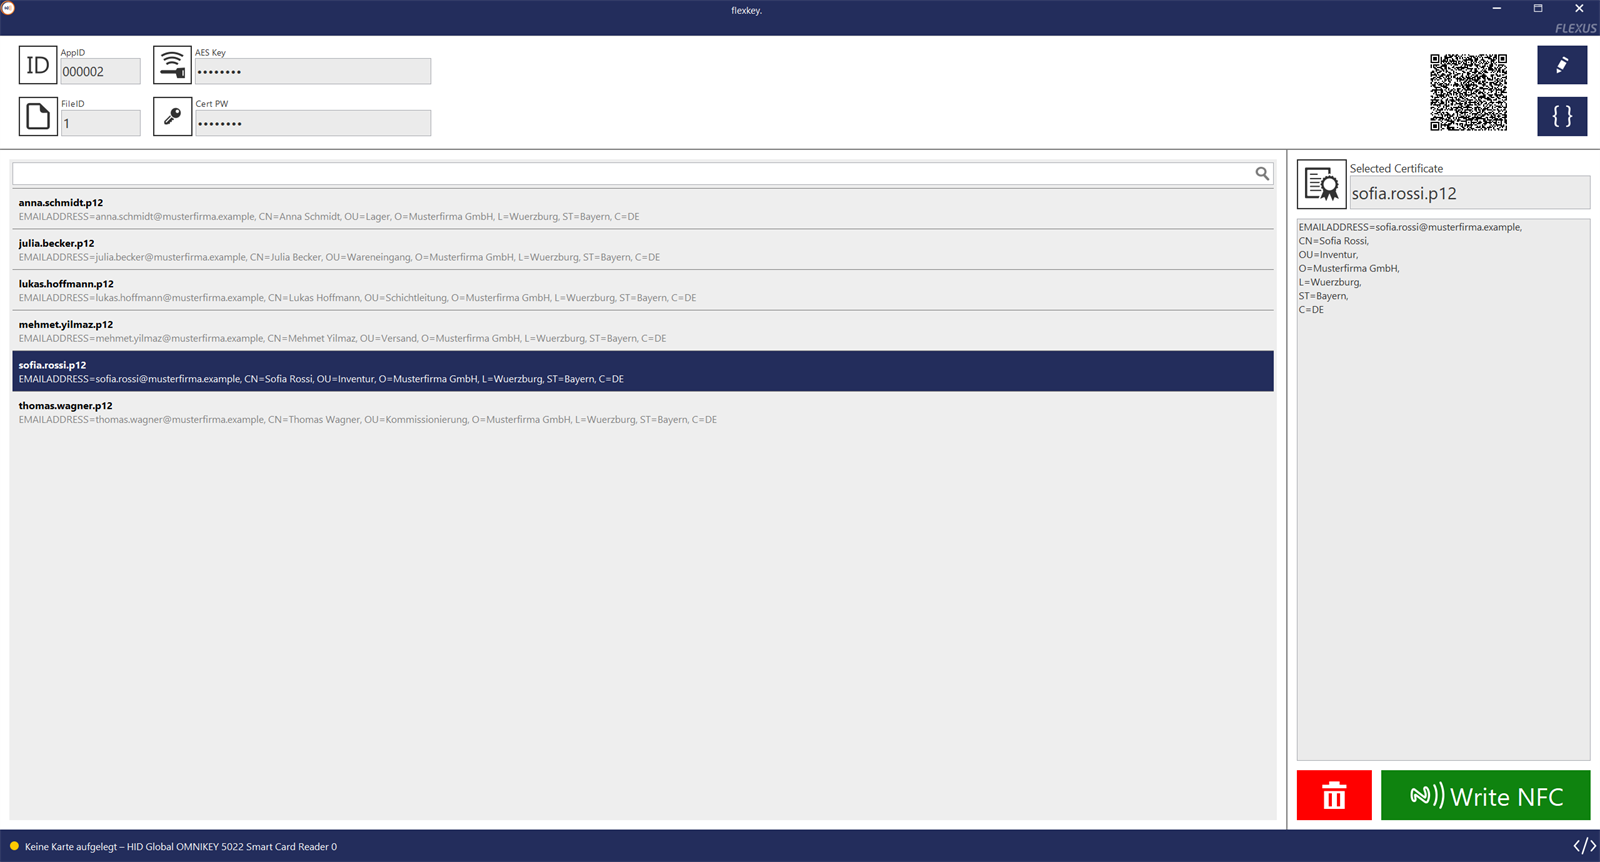
Start FlexKey.
Switch to edit mode with the pen button in the top right corner.
Fill in the four fields:
Field Content AppID Area on the card where the certificate is stored. Default: 000002FileID File within this area. Default: 1AES Key Key that locks the card: exactly 32 characters from 0-9anda-fCert PW The shared password of the .p12 files Save with the floppy disk button.
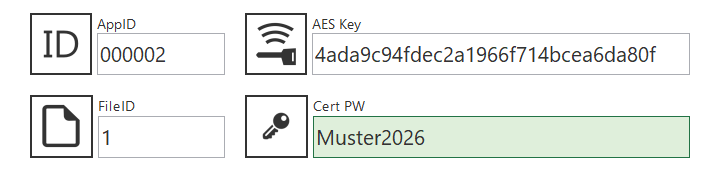
It is best to leave AppID and FileID at their defaults. You only need to change them if the cards already hold something else at this location.
Use a random value for the AES Key. FlexKey creates one at the push of a button: in edit mode, the button Zufälligen AES Key erzeugen (create random AES Key) appears to the right of the field. FlexKey warns you first: if an AES Key is already set up, all cards written with it become unusable. The new key is only applied with the floppy disk button.
Alternatively with OpenSSL:
openssl rand -hex 16Never use an example value from a guide. FlexKey does not accept an AES Key made up only of zeros: it would leave the card unprotected.
Outside edit mode, FlexKey only shows AES Key and Cert PW masked.
Keep it safe
AES Key and Cert PW apply to all cards of your company. FlexKey stores them in the file FlexKeyConfig.json next to flexkey.exe. Back up this file in a protected place, like a password.
Changing these values means rewriting all cards and distributing the configuration to all devices again. So set them once and do not change them afterwards.
2. Write cards
- Connect the card reader. The status line at the bottom shows whether a reader is detected and a card is present.
- Drag and drop the folder containing the .p12 files onto the large empty area. FlexKey lists all certificates in it.
- Select a certificate. Its details appear next to it.
- Place a card on the reader.
- Click Write NFC. FlexKey writes the certificate and reads it back right away to verify it.
- Label the card with the user's name.
If everything worked, FlexKey reports at the bottom left: Zertifikat geschrieben und geprüft! (certificate written and verified)

For the next card: swap the card, select the next certificate, Write NFC.
Certificate cannot be loaded
If a certificate shows Fehler beim Laden: Das Zertifikatspasswort ist falsch. (wrong certificate password), the Cert PW does not match the password of the .p12 file. Correct it in edit mode and save. FlexKey then reloads the certificates immediately.
FlexKey does not write a certificate that cannot be loaded to the card. TheFlex could not use it anyway.
Rewrite or erase a card
A card can be rewritten at any time, for example with a renewed certificate or for another user. If writing fails, FlexKey shows the reason and, where it helps, suggests formatting the card.
The red trash button erases the card completely. Afterwards it can be written like a new card.
If something goes wrong
FlexKey shows every error in a window: what happened and what you can do. The details of each step are in the log. Open it with the </> button at the bottom right. FlexKey also writes the log to the file logs\flexkey.log in the FlexKey folder (the last three days). This file helps us if you contact support.
FlexKey itself shows its messages in German. The table lists them with a translation.
| Message | Cause | Solution |
|---|---|---|
| Kein Kartenleser gefunden. (no card reader found) | Reader not connected or without driver | Connect the reader. Its name must appear in the status bar |
| Keine Karte auf dem Kartenleser ... (no card on the reader) | No card on the reader | Place the card flat on the reader until the status bar shows Karte verbunden |
| Der Windows-Smartcard-Dienst läuft nicht. (smart card service not running) | Smart Card service stopped | Start the service in the Windows services console or reconnect the reader |
| Der Kartenleser wird von einem anderen Programm verwendet. (reader in use) | Another program holds the reader | Close the other program |
| Eingabe prüfen (check input) when saving | AppID, FileID or AES Key have the wrong format, or AppID 000000 or an AES Key made up only of zeros | The message names the field and the expected length. The AES Key has exactly 32 characters and is a random value |
| Kein AES Key eingerichtet (no AES Key set up) when writing | FlexKey found no configuration, for example because FlexKeyConfig.json is in a different folder | Copy FlexKeyConfig.json next to flexkey.exe and restart FlexKey. On first setup, enter AES Key and Cert PW and save |
| Zertifikat nicht lesbar (certificate unreadable) when writing | The .p12 file cannot be opened, usually the Cert PW does not match | Correct the Cert PW and save. If the file is damaged, issue the certificate again |
| Anmeldung mit dem konfigurierten AES Key fehlgeschlagen. (authentication failed) | The card was written with a different AES Key | Enter the AES Key used back then or format the card |
| Die Anwendung 000002 ist nicht auf der Karte und konnte nicht angelegt werden. (application could not be created) | Card is locked against changes or is not a DESFire card | Use a different card, see Which cards are suitable? |
| Auf der Karte ist nicht genug Speicher für das Zertifikat. (not enough memory) | Card too small or already in use | Format the card. For certificates with a 4096 bit key use an 8 KB card |
| Die Kommunikation mit der Karte wurde unterbrochen. (communication interrupted) | Card moved while writing | Leave the card on the reader and write again |
| Die Prüfung nach dem Schreiben ist fehlgeschlagen ... (verification failed) | The data on the card differs | Write again. Do not hand out the card until then |
| Konfiguration nicht lesbar (configuration unreadable) at startup | FlexKeyConfig.json is damaged | FlexKey saves the file as FlexKeyConfig.unlesbar-... and starts with default values. Enter AES Key and Cert PW again |
| Speichern fehlgeschlagen (saving failed) | No write access in the FlexKey folder | Copy FlexKey to a folder with write access |
| FlexKey konnte nicht gestartet werden (FlexKey could not be started) | Java missing or too old, or part of the package missing | The message names the Java version. Unpack the FlexKey package again completely |
3. Hand the configuration to TheFlex
TheFlex needs the same four values as FlexKey to read the cards. FlexKey provides them in two ways:
- QR code: FlexKey shows it next to the settings. It is scanned in TheFlex, good for individual devices.
- Value for MDM: The button with the curly braces { } (Wert für MDM anzeigen, show value for MDM) opens a dialog. Kopieren (copy) puts the value on the clipboard. It is entered as
NFCConfigin the device management, good for many devices.
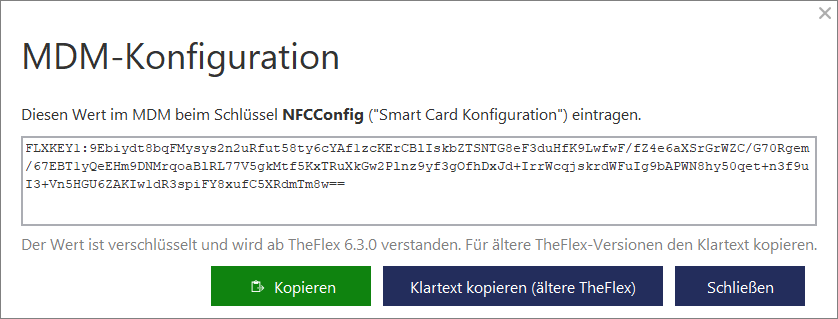
Both are encrypted; the MDM value starts with FLXKEY1:. TheFlex understands this as of version 6.3.0. For older TheFlex versions, the dialog offers Klartext kopieren (ältere TheFlex) (copy plain text).
How to load the configuration into TheFlex is described in Login with smartcard.
Treat it as confidential
QR code and MDM value are encrypted, but they are still the key to your cards: whoever loads them into a TheFlex can read the cards. Do not put the QR code on display, and only give the value to the people who set up devices.
Your own tools instead of FlexKey
FlexKey is just one example. If you issue cards with your own program, you can write the certificate yourself. How the card has to be structured is described in Writing smartcards with your own tools.